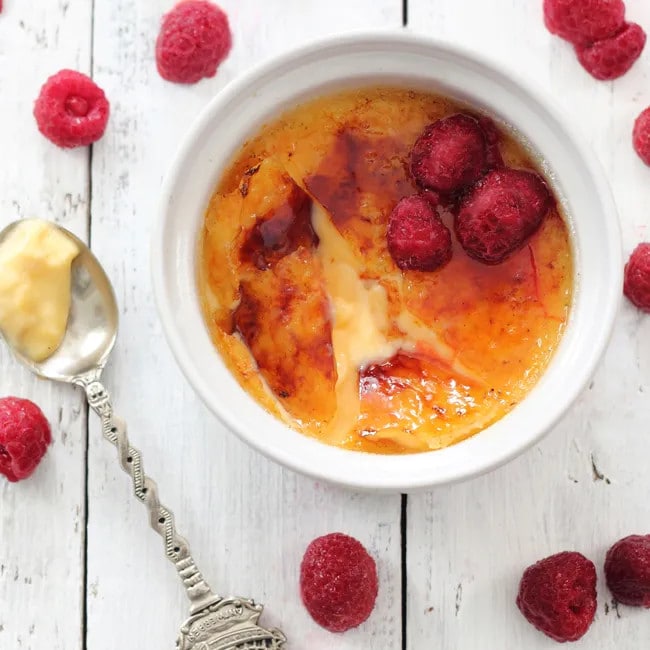
A classic Crème Brulee is made primarily of cream, sugar, egg yolks and vanilla. This simple, basic recipe really must be sampled to fully appreciate its subtle textures and flavourings.
Having said that, it’s perfectly natural to want to play around with different taste combinations – for instance, I’ve also made an Espresso Crème Brulee and a Chocolate Creme Brulee both of which were truly scrummy. This time around though, I stayed with the classic version – the elegant go-to dessert for any occasion.
The trick to making the perfect Crème Brulee is knowing when to take it out of the oven. I’ve been to plenty of restaurants where they were overcooked and rubbery. The custards must be taken out of the oven a little before they look completely cooked, as they will continue to firm up in the fridge. The rule of thumb is that, when shaking the dish gently, there’s a definite jiggle in the middle. A wave or rolling action tells you it’s not cooked enough. And if it’s completely set, well.. it’s already overcooked I’m afraid. The custard, when you serve it, should be soft and fall easily from the spoon. It’s the contrast between that delicate silkiness of the custard and the hard, toffee shards that you crack through to reach it that make this dessert so uniquely special.
I wish I knew where I got this original recipe from so that I could credit the source, but sadly over time I’ve lost the details. However, at the end of the day it’s a fairly standard recipe which I’ve adapted somewhat anyway. But good thoughts to whomever and wherever it came from!

CLASSIC CRÈME BRULEE
Ingredients
- 2.5 cups cream
- 1 vanilla pod (or 1 tsp vanilla extract)
- 6 large egg yolks
- 1/3-1/2 cup sugar, to taste
- 1/8 tsp pinch salt
- Caster sugar (for topping)
Instructions
- Pre-heat the oven to 150°C (300°F). Fill your hot water jug with water and put onto the boil.
- Pour the cream into a small saucepan. Add the seeds from the vanilla pod and the pod itself and heat gently (it doesn’t need to be stirred) until it scalds, just short of boiling. Take off heat and put aside.
- Place the egg yolks, first measure of sugar and salt into an electric mixing bowl and beat until the mixture is thick and pale.
- Using a whisk now, pour the hot cream mixture into the egg mixture – add just a little at first to temper the mixture so the eggs don’t curdle, then whisk gently for about 5-10 seconds. Pour the remainder of the cream in carefully as you continually whisk – don’t over-whisk though, as it will aerate the mixture and create foam. Pour the mixture through a sieve into a pourable jug to remove any lumps (and the pod).
- Put 6 ramekins into a roasting pan (it’s helpful to have a tea-towel folded in the pan to ensure the ramekins don’t slip about). Carefully pour the custard into the ramekins, leaving about a centimeter at the top of each. You may need to scoop off any surface foam.
- Now put the roasting pan into the oven (middle rack), but just before you push it all the way in, carefully pour in the jug of boiled water to fill to about halfway up the sides of the ramekins (take care not to splash water into the ramekins themselves). Now push the roasting pan fully into the oven. You may or may not like to place a piece of silver foil loosely over top if you’re worried about the custards getting too hot, however it’s usually not needed and it will slow cooking time.
- Cook the custards until, when lightly shaken they jiggle in the middle (depending on the oven and the size of the ramekins, this can take anywhere from 35-45 minutes, even more). Remove the roasting pan from the oven, carefully remove the ramekins and place them on a wire rack to cool.
- Once completely cooled, put the custards into the fridge (you can lightly place a piece of silver foil or plastic wrap over top, but it’s not necessary) and chill for at least four hours (but preferably overnight).
- When ready to serve, sprinkle each custard evenly with 1-2 teaspoons of caster sugar (the more the sugar, the thicker the crust) and spread it evenly with the back of a teaspoon. Before the next step: Put each ramekin on a piece of silver foil or tray to avoid burning the bench! Using a blow torch, and one ramekin at a time, work from the outside to the inside using small circular motions (one or two inches from the surface). Let it rest for a minute, then come back for a second or third grilling. Don’t be shy about letting the sugar burn in places – it’s meant to! Let the caramelized sugar cool and harden to form a crisp layer (at least 5-10 minutes) then serve immediately. They go particularly well with raspberries which cut nicely through the sweetness.

