
Red Velvet Cake (Vertical Layer)
Celebrate with this eye-catching Vertical Layer Red Velvet Cake. Fluffy red velvet cake layers, a swirl of cream cheese frosting, and a vibrant pop of color create a dessert that's as delicious as it is beautiful.
Equipment
Ingredients
For the red velvet cake:
- 1/4 cup cocoa powder
- 2/3 cup hot water
- 6 eggs
- 1-1/2 cups caster sugar plus extra for sprinkling
- 2 cups self-raising flour (I used gluten-free flour blend plus 2 teaspoons baking powder)
- 1 tbsp red food colour gel
- 1 tsp vanilla extract
For the cream cheese icing:
- 6.3 oz butter , softened
- 7 oz icing sugar , sifted
- 17.6 oz cream cheese , room temperature
- 1 tsp vanilla extract
Instructions
For the red velvet cake:
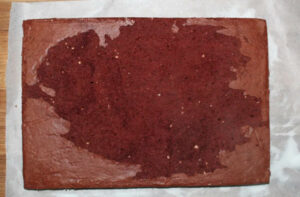
- Heat oven to 180C (360F). Grease and line two 30cm x 24cm (approx. 12 x 9 inch) sponge roll tins*.
- Place cocoa in a small bowl with hot water, mix to dissolve then leave to cool.
- Beat eggs until thick and creamy. Slowly add caster sugar, beating until mixture is very thick and sugar has dissolved.
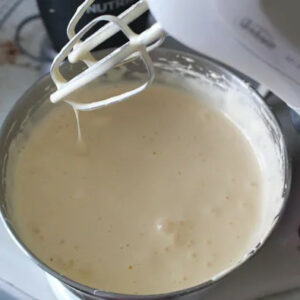
- Sift flour over and gently fold in.
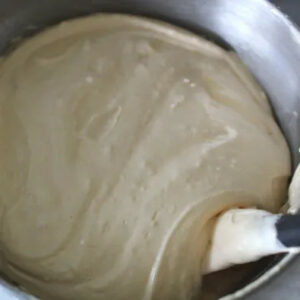
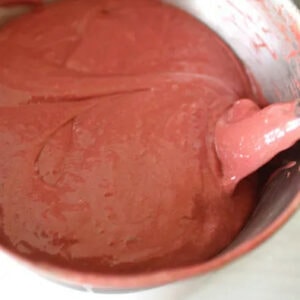
- Stir red gel and vanilla into cocoa mixture until well combined, then gently fold into sponge mixture until colour is evenly mixed.
- Divide mixture between tins and bake for 12-15 minutes, or until springy when pressed gently in the middle (you can also test by inserting a skewer, which should come out clean).
- Turn sponges out onto 2 sheets of baking paper that have been sprinkled generously with caster sugar (this will help stop the cake sticking to the paper) and, while still hot, carefully remove lining paper.
- While still warm, gently roll up sponges from the short ends, rolling the baking paper inside the roll (it helps to score the sponge along its width about an inch in – this will start the rolling process).
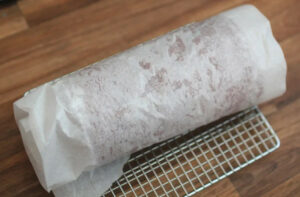
- Place rolls on a wire rack to cool for 15 minutes, then carefully unroll and allow to cool completely.
For the icing:
- Pulse butter and icing sugar together in a food processor. Add cream cheese and vanilla and blend until smooth. If not using immediately, store in the fridge.
To assemble cake:
- Cut the 2 sponges in half lengthwise to make 4 strips.
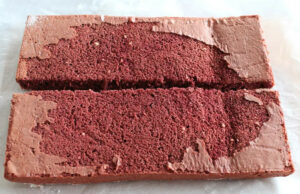
- Spread about a third of the icing evenly over the sponges, leaving a 1cm (quarter inch) border all around (ensure you get a generous even coverage with the cream cheese, as this is what will show up as vertical lines in your cake).

- Line up sponges in a long line, overlapping slightly where each one meets (I suggest overlapping a good inch to avoid gaps between the sponges while rolling).
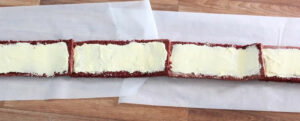
- Starting at one short end, carefully roll them up into a log.
- Note: If you’re concerned that your cake might not hold its shape, I suggest you wrap the sides in wax paper, along with a few layers of plastic wrap, then store in the fridge** for a few hours (or overnight) to firm up. If the cake is seriously threatening to unravel, try wrapping it in string or ribbon (which will avoid dents), at least for a couple of hours – this will draw the cake in tightly.

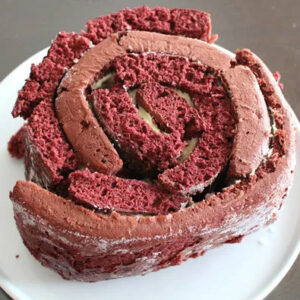
- Place cake on a serving plate, flat side down, and cover top and sides with remaining icing. If desired, decorate with shaved white chocolate. If refrigerating, take the cake out of the fridge about an hour before serving.
- The cake will keep 3-4 days in an airtight container in the fridge.
Notes
* I used just one tin, and baked the cakes one after the other. PS: In other countries they can be called jelly roll or swiss roll tins/pans.
** Some people are okay about storing a cake with cream cheese icing in a cool place rather than a fridge, unless the temperature is very warm and humid.
Nutrition
Calories: 461kcalCarbohydrates: 43gProtein: 8gFat: 29gSaturated Fat: 17gPolyunsaturated Fat: 2gMonounsaturated Fat: 8gTrans Fat: 0.5gCholesterol: 156mgSodium: 259mgPotassium: 138mgFiber: 1gSugar: 26gVitamin A: 1050IUCalcium: 62mgIron: 1mg
Tried this recipe?Let us know how if you liked it in the comments below!