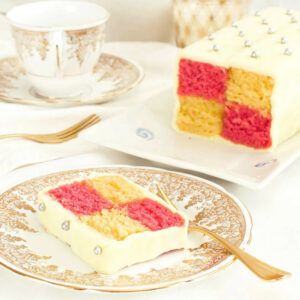
BATTENBERG CAKE
This delightful dessert combines soft sponge in pretty pink and traditional colors, all wrapped in smooth marzipan. Perfect for adding a pop of color and a dash of almond sweetness to your tea time. Fancy giving it a try for your next gathering or just to treat yourself?
Equipment
- 1 Electric Hand Mixer
Ingredients
For the cake:
- 6.1 oz really soft butter
- 6.1 oz golden caster sugar (superfine - I used regular caster sugar)
- 3 medium eggs
- 1.7 oz ground almonds (almond meal)
- 4.9 oz self-raising flour (I used a gluten-free flour blend plus one teaspoon baking powder)
- 1/2 extra tsp baking powder
- 1/2 tsp almond extract (I used 1/4 teaspoon almond extract paste)
- Pink food colouring
To assemble:
- 5.2 oz apricot jam
- Icing sugar (confectioner's sugar), for dusting
- 17.6 oz pack white marzipan (almond flavoured - you won't need all of this - you can freeze left-overs for another time)
Instructions
- Heat oven to 180°C (360°F).
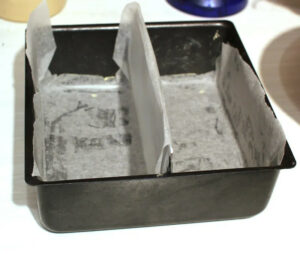
- Grease a 20cm (8 inch) square tin (it doesn’t need to be a deep sided tin as the cakes are quite shallow). Cut a piece of baking paper twice the length of the tin and fold the paper in half widthways. Open out the paper and push up the centre fold to make a pleat at least as high as your tin. Use a foil insert to strengthen this pleat – measure a length of foil to sit inside the pleat and fold it over several times to increase its sturdiness. Line the base of the tin with this, making any adjustments to ensure the pleat runs down the centre of the tin making in effect two rectangular ‘tins’ within the tin. It helps to have an overhang of baking paper on each side so you can lift the cakes out once baked.
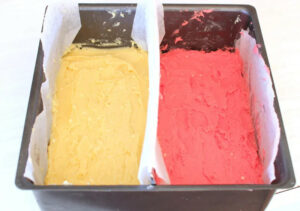
- Put all the cake ingredients except the food colouring in a large mixing bowl and blend with an electric hand whisk until smooth.
- Tip half the cake mixture into one side of the tin (I recommend you weigh the mixture first so you can calculate the half amount exactly).
- Mix the food colouring into the remaining cake mixture. When you have a smooth and vivid pink colour, scrape this mixture into the other side of the tin, then level the surface of the two cakes with an offset spatula.
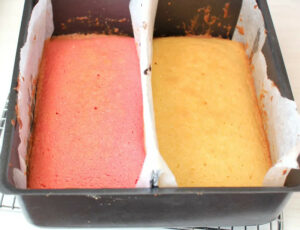
- Bake for 25-30 mins until the tops are lightly golden and a skewer comes out clean. Cool in the tin for 15 mins, then transfer to a wire rack (lifting the cakes out by holding onto the overhanging sides and middle pleat of baking paper – a second person to help is useful!) to cool completely.
- Once cooled, place the cakes on a chopping board and trim the sides of each one to give you a straight edge.
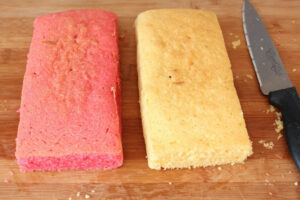
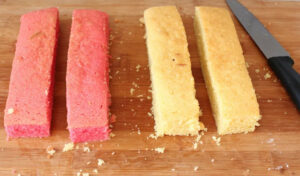
- Cut each cake in half lengthways to give you 2 pink and 2 plain rectangular sponges, using a ruler if you want to be really exact. If the sponges are a little taller than they are wide, trim some sponge from the tops as well – this will ensure you have a perfect square when you come to assemble the cake.
- Heat the apricot jam in a small pan or the microwave, then sieve it.
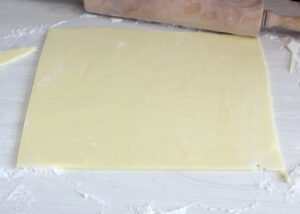
- Lightly dust a work surface with a little icing sugar, then roll out the marzipan to a rectangle big enough to wrap around the whole cake.
- Brush the surface of the marzipan with the warm apricot jam (if you find the jam too thick to spread, add a touch of boiling water to thin it down), then place 1 plain sponge and 1 pink sponge side by side on top (in the middle), brushing the inside edge of the cakes with a little jam to stick them together (I found applying the jam with a small offset spatula worked better than a brush and avoided dragging crumbs).
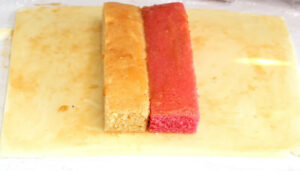
- Brush the top of the cakes with more jam, then place the remaining sponges on top, with more jam in between, in a checkerboard pattern.

- If you have any left over jam, brush it over the outside of the assembled cake. Then, carefully lift the marzipan over the cake, smoothing it over the top and sides, and join it together on the top of the cake (roughly in the middle), easing it together with your fingers – don’t worry if it’s not perfect – this will be underneath the cake in the end and no-one will see it.
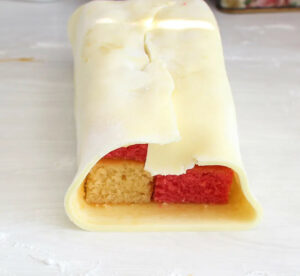
- Gently roll the cake over with the seam underneath. Using a sharp knife, trim about a centimetre off each end of cake (which will automatically trim the marzipan at the same time) and place on a serving platter.
- If you wish to make any designs in the marzipan, you can do so now (I pressed a diamond design cutter into the top, then placed silver cachous at the intersecting lines, adhering them with a small dot of jam). Alternatively, you can crimp the top edges with your fingers or simply keep it plain.
- Slice into 8 thick slices and serve.
Nutrition
Calories: 690kcalCarbohydrates: 77gProtein: 12gFat: 39gSaturated Fat: 13gPolyunsaturated Fat: 4gMonounsaturated Fat: 16gTrans Fat: 1gCholesterol: 108mgSodium: 221mgPotassium: 211mgFiber: 4gSugar: 55gVitamin A: 675IUVitamin C: 2mgCalcium: 95mgIron: 2mg
Tried this recipe?Let us know how if you liked it in the comments below!