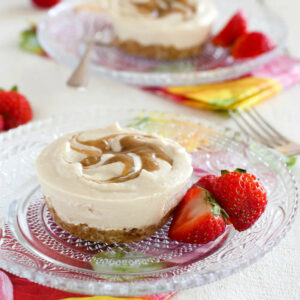
RAW VANILLA ‘CHEESECAKES’ WITH DATE CARAMEL SAUCE
Enjoy a guilt-free indulgence! These delightful raw 'cheesecakes' feature a nutty crust, a creamy vanilla cashew filling, and a luscious date caramel sauce. Dairy-free, vegan, and naturally sweetened, they offer a burst of natural sweetness and satisfying textures. Perfect for a special treat or a healthy dessert – try different nuts in the crust for a new flavor!
Equipment
Ingredients
For the base:
- 1/2 cup raw almonds either with skins on or blanched (pecans or walnuts will also work)
- Optional: 1/2 cup flaked or shredded coconut
- 1/2 cup soft pitted Medjool dates
- 1/8-1/4 tsp sea salt
- 1 tsp pure vanilla extract
- Up to 1 tbsp coconut, oil melted (only add if needed)
For the filling:
- 1/3 cup raw coconut oil, melted
- 1½ cups raw cashews soaked in water for at least 5 hours or overnight, then drained
- 2 tbsp lemon juice
- 1 tsp pure vanilla extract
- Optional: 1 tsp Savoury Yeast Flakes Nutritional Yeast – this adds a ‘cheesy’ flavour
- 1/3 cup to taste of pure maple syrup or raw honey (solid or liquid), or agave nectar
- Up to 6 tablespoons water (only add if needed)
For the Date Caramel Sauce: NB. Makes more than enough for your cheesecake/s with extra to spare
- 1 cup loosely packed pitted Sayer or Medjool dates
- 1-1/4 cup water (warm or hot is best)
- 1/4 tsp sea salt
- 2½ to 3 tsp pure vanilla extract
- 1 tsp baking soda
- 1 tsp baking powder
- Optional: 1 tbsp chia seeds (don’t add if you want a very smooth sauce)
Instructions
For the Base:
- Place all the ingredients (except the coconut oil) in a food processor and pulse to chop until they are to your desired texture (process longer for a finer texture).
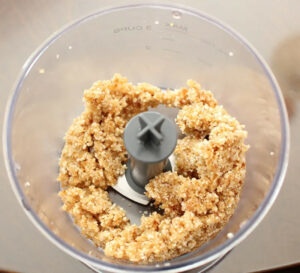
- Test the base by spooning out a small amount of mixture and rolling it in your hands. If the ingredients hold together, your base is perfect. If it’s not quite there yet, add up to a tablespoon of coconut oil until the texture is right.
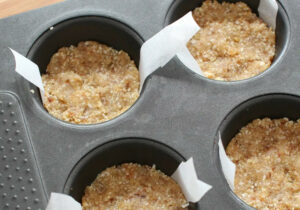
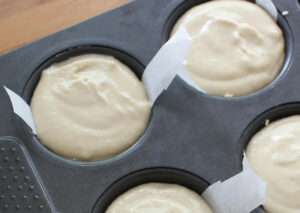
- Divide base mixture into a lightly greased 12 hole muffin pan (you will only need to grease about 8 holes, depending on how big your muffin pans are). Otherwise, if you have doubled or tripled the recipe, pour the mixture into an 8 or 9 inch (20 or 23 cm) spring-form cake pan.
- Press the mixture firmly, making sure that the edges are well packed and that the surface is even. If making ahead, you can pop the bases into the freezer. Otherwise, just put them aside.
- Rinse your food processor well (if you’re not using a separate blender for the filling).
For the Filling:
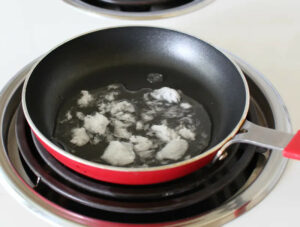
- Warm coconut oil in a small saucepan or fry-pan on low heat until melted (if you’re using solid honey, add it to the coconut oil at the same time and then whisk to combine).
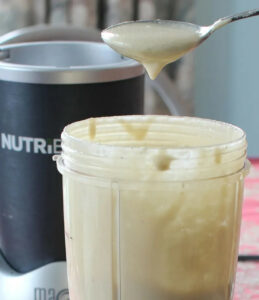
- In your most powerful food processor/blender place all filling ingredients, including the melted coconut oil (and melted honey, if using).
- Pulse initially to break down the nuts, then blend on high until very smooth (this make take a couple minutes and you may need to stop occasionally and scrape down the sides of the blender). If the mixture ends up too thick and it’s not blending smoothly, add a little water (up to 6 tablespoons (90 ml) may be necessary) and continue to process until smooth – the end result should be thick and gloopy (not runny). Give it a taste to check on its flavour and adjust as needed.
- Divide the mixture amongst the pans over top of the bases. Put aside while you make the Date Caramel Sauce.
For the Date Caramel Sauce:
- Blend all ingredients together in a food processor until smooth (you might need to use the ‘pulse’ mode initially to break down the dates). This may take a couple of minutes. Scrape down the sides from time to time if necessary.
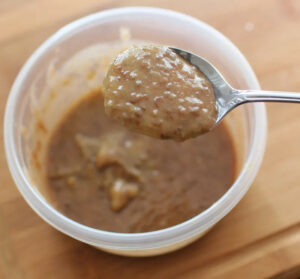
- Taste to ensure there’s a good contrast between sweet and salty and adjust seasoning as needed. NB: If not using straight away, transfer to an airtight container and store container in the fridge until ready to use.
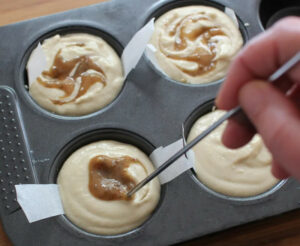
- Dollop a small amount of caramel sauce onto each mini-cheesecake (or several tablespoons of it onto a large cheesecake), then using a skewer or toothpick swirl the mixture through the vanilla filling.
Freezing & Serving:
- Place the pan into the freezer for at least two hours until the cheesecakes are solid.
- Remove cheesecakes from freezer at least 30 minutes prior to eating (a full cheesecake will take longer to thaw; see notes about thawing times) and remove from the muffin or cake pan (see notes about removing cakes from pans). They should be soft and creamy, yet still chilled when you eat them.
- Serve the individual cheesecakes on separate serving plates. Or, if you have made a full-sized cake, run a smooth, sharp knife under hot water and cut into slices. Serve with fresh fruit, a fruit sauce or compote.
Storage and freezing instructions:
- For the cheesecake/s: You can store the cheesecake/s in a sealed container or wrapped in plastic wrap in your fridge for up to 5-6 days. Or you can keep them in your freezer for up to 6-8 months – just keep them sealed in plastic wrap and then wrapped in a double layer of foil for extra protection.
- For the date caramel sauce: You can store any remaining sauce in your fridge where it should last for about a week. Or, you can divide it into individual plastic freezer bags and freeze for several months (they can then be defrosted and used as a healthy sweetener in smoothies, etc.).
Notes
- The original recipe makes one full-sized cheesecake in a 7 inch (18cm) pan. As this is not a standard sized pan, I suggest that if you want to make a cheesecake in a standard 8 or 9 inch (20 or 23cm) pan, that you at least double, if not triple, the recipe.
- If using a muffin pan, you can line the holes with strips of baking paper to help lever the cheesecakes out if you wish. Otherwise, I found it easier to simply slide a warmed knife around the outside of the cheesecakes and pop them out.
- Adding a teaspoon of savoury yeast flakes (nutritional yeast) to your filling mixture adds a ‘cheesy’ taste as to your cheesecakes.
- You need a powerful food processor or blender for mixing a smooth, creamy filling – a Vita-Mix or Nutri-bullet, or similar, is ideal.
- When working with ingredients like nuts, dates and raspberries, there’s always going to be a little variance in the resulting mixture, depending upon how dry or moist the ingredients are. I’ve made this recipe several times now and each time the mixture was a little different – either wetter, thicker, or more textured, etc. The key then is to adjust intuitively – for instance, adding a touch more coconut oil or water for more moisture, adding more nuts or dates to increase thickness, etc.
- It’s best if you remove the cakes while they’re still frozen, rather than waiting until they soften or they may fall apart.
- The recipe suggests you take the cheesecakes out of the freezer at least 30 minutes before serving. Thawing time may differ depending on room temperature and how frozen the cheesecakes are. If in doubt, take them out of the freezer earlier and put them in the fridge, then bring to room temperature 20-30 minutes before eating. Ensuring they have enough defrosting time is particularly important if you’re making a large cheesecake – it may need double the time to defrost properly.
Nutrition
Calories: 381kcalCarbohydrates: 40gProtein: 7gFat: 24gSaturated Fat: 10gPolyunsaturated Fat: 3gMonounsaturated Fat: 9gTrans Fat: 0.001gSodium: 304mgPotassium: 454mgFiber: 4gSugar: 29gVitamin A: 41IUVitamin C: 2mgCalcium: 95mgIron: 2mg
Tried this recipe?Let us know how if you liked it in the comments below!